Introduction:
Python is a powerful programming language that has become a standard tool in machine learning, data science, and scientific computing. With excellent libraries like NumPy, SciPy, and Matplotlib, Python is ideal for engineering applications. In this course, we will explore how to use Python for simulating and controlling robotic systems.
If your experience is mainly with Arduino or MATLAB, don’t worry—many concepts will feel familiar, and Python’s syntax is straightforward and beginner-friendly. With the support of modern tools and resources such as AI-assisted coding (e.g., Copilot), you’ll find that learning Python is both accessible and rewarding. Every mechanical engineer can become a confident Python coder!
This lab will only provide the basics for Python. You can try to find other resources online to learn more. For instance, this webpage provide more examples in the context of numerical methods:
https://
Learning Objectives:
Learn the structures of data and commands in Python with NumPy
Gain knowledge and familiarity with Jupyter notebooks and Python scientific libraries
Learn how to get help with Python and its libraries
Solve mathematical problems with Python and plot the solutions
Work with arrays, functions, and visualization tools
Setting Up: Selecting the Python Kernel
Before running any code in this notebook, you must select the correct Python environment (called a kernel).
We have used miniconda to a dedicated environment named me416 that has all the required packages pre-installed.
Steps to select the kernel in VS Code
Look at the top-right corner of the VS Code window. You will see a button showing the current kernel (it may say “Select Kernel”).
Click that button. A drop-down menu will appear at the top of the screen.
Choose “Python Environments...” from the menu.
Select
me416from the list of available environments.
Note: If you do not see
me416in the list, please make sure you have created the environment by following the instructions in Lab0. Do not use any other kernel, as required packages may be missing.
Once the kernel is set, the top-right button should display me416. You are now ready to run the cells below.
Task 1 – Basic Python Syntax
Before diving into NumPy and scientific computing, review a few core Python syntax concepts. Python is widely used in engineering because its syntax is simple, readable, and efficient for technical work.
Key Python Concepts
Variables and Data Types
Python assigns data types automatically based on the value (e.g.,int,float,str,bool,complex). You do not need to declare a type before using a variable.Lists and Dictionaries
Lists store ordered, editable collections of values.
Dictionaries store data as key–value pairs, which is useful for material properties and structured engineering parameters.
Control Flow
if/elif/elsestatements let code make decisions, whileforandwhileloops repeat tasks. These are essential for automating calculations and processing datasets.Functions
Functions package reusable logic into named blocks. This makes code cleaner, easier to test, and easier to maintain in larger engineering scripts.String Formatting (f-strings)
F-strings (for example,f"Value: {variable}") make printed output clear and concise, which helps with debugging and reporting results.
Run the code cells below using the Run button on the left side of each cell.
If this is your first run, Jupyter may ask to install ipykernel—approve the installation.
# Variables and Basic Data Types
# Python automatically determines the type based on the value assigned

# Numbers
integer_var = 50
float_var = 3.14159
complex_var = 3 + 4j

# Strings
name = "Mechanical Engineer"
course = 'MECH 416 Introduction to Robotic Manipulators'

# Boolean
is_python_awesome = True

# print the result: the 'f' before the string enables f-string formatting for variable substitution
print(f"Integer: {integer_var}, type: {type(integer_var)}")
print(f"Float: {float_var}, type: {type(float_var)}")
print(f"Complex: {complex_var}, type: {type(complex_var)}")
print(f"String: {course}, type: {type(course)}")
print(f"Boolean: {is_python_awesome}, type: {type(is_python_awesome)}")
Integer: 50, type: <class 'int'>
Float: 3.14159, type: <class 'float'>
Complex: (3+4j), type: <class 'complex'>
String: MECH 416 Introduction to Robotic Manipulators, type: <class 'str'>
Boolean: True, type: <class 'bool'>
# Lists - ordered, mutable collections (like MATLAB cell arrays)
forces = [100, 250, 75, 500]  # List of forces in Newtons
materials = ["Steel", "Aluminum", "Titanium", "Carbon Fiber"]

print(f"Forces: {forces}")
print(f"Second force: {forces[1]} N")  # Python uses 0-based indexing
print(f"Last force: {forces[-1]} N")  # Negative indexing from the end

# Adding elements
forces.append(150)  # Add to end
print(f"After adding 150 N: {forces}")

# List slicing (very powerful!)
print(f"First three forces: {forces[0:3]}")  # Elements 0, 1, 2
print(f"All forces: {forces[:]} or {forces}")
Forces: [100, 250, 75, 500]
Second force: 250 N
Last force: 500 N
After adding 150 N: [100, 250, 75, 500, 150]
First three forces: [100, 250, 75]
All forces: [100, 250, 75, 500, 150] or [100, 250, 75, 500, 150]
# Dictionaries - key-value pairs (like MATLAB structures)
material_properties = {
    "Steel": {"density": 7850, "yield_strength": 250},  # kg/m³, MPa
    "Aluminum": {"density": 2700, "yield_strength": 70},
    "Titanium": {"density": 4500, "yield_strength": 880}
}

print("Material Properties:")
for material, props in material_properties.items():
    density = props["density"]
    strength = props["yield_strength"]
    print(f"  {material}: ρ = {density} kg/m³, σy = {strength:.0f} MPa")
Material Properties:
Steel: ρ = 7850 kg/m³, σy = 250 MPa
Aluminum: ρ = 2700 kg/m³, σy = 70 MPa
Titanium: ρ = 4500 kg/m³, σy = 880 MPa
# Control Flow: if/else statements
force = 400  # Newtons, you can change this value to test the if/else statements
max_allowable = 400  # Newtons

if force > max_allowable:
    safety_factor = force / max_allowable
    print(f"⚠️  Force {force} N exceeds limit of {max_allowable} N")
    print(f"   Safety factor: {safety_factor:.2f}")
elif force == max_allowable:
    print(f"✓ Force exactly at limit: {force} N")
else:
    margin = max_allowable - force
    print(f"✓ Force {force} N is safe (margin: {margin} N)")
✓ Force exactly at limit: 400 N
# Loops: for and while
print("For loop example - analyzing different loads:")
loads = [100, 250, 75, 450, 200]  # Newtons

for i, load in enumerate(loads):  # enumerate gives both index (i) and value
    status = "SAFE" if load < 400 else "OVER LIMIT" # check if a given load is safe or not
    print(f"  Load {i+1}: {load} N - {status}")

print("\nWhile loop example - finding critical load:")
load = 100
increment = 50
limit = 400

while load <= limit:
    print(f"  Testing load: {load} N")
    load += increment

print(f"  Critical load exceeded at: {load} N")
For loop example - analyzing different loads:
Load 1: 100 N - SAFE
Load 2: 250 N - SAFE
Load 3: 75 N - SAFE
Load 4: 450 N - OVER LIMIT
Load 5: 200 N - SAFE
While loop example - finding critical load:
Testing load: 100 N
Testing load: 150 N
Testing load: 200 N
Testing load: 250 N
Testing load: 300 N
Testing load: 350 N
Testing load: 400 N
Critical load exceeded at: 450 N
# Functions - essential for reusable codes
def calculate_stress(force, area):
    """
    This function calculates stress given force and area.

    Parameters:
    force (float): Applied force in Newtons
    area (float): Cross-sectional area in m²

    Returns:
    float: Stress in Pascals
    """
    if area <= 0:
        raise ValueError("Area must be positive")

    stress = force / area
    return stress

def safety_check(stress, yield_strength, safety_factor=2.0):
    """Check if design meets safety requirements"""
    allowable_stress = yield_strength / safety_factor
    is_safe = stress <= allowable_stress  # True if stress is less than or equal to allowable

    return {
        "is_safe": is_safe,
        "stress": stress,
        "allowable": allowable_stress,
        "utilization": stress / allowable_stress
    }

# Example usage
force = 10000  # N
diameter = 0.02  # m
area = 3.14159 * (diameter/2)**2  # m²

stress = calculate_stress(force, area)
result = safety_check(stress, 250e6)  # Steel yield strength

print(f"Engineering Analysis:")
print(f"  Applied force: {force} N")
print(f"  Cross-sectional area: {area*1e6:.1f} mm²")
print(f"  Calculated stress: {stress/1e6:.1f} MPa")
print(f"  Safety status: {'✓ SAFE' if result['is_safe'] else '⚠️ UNSAFE'}")
Engineering Analysis:
Applied force: 10000 N
Cross-sectional area: 314.2 mm²
Calculated stress: 31.8 MPa
Safety status: ✓ SAFE
Key Takeaways:
Python is readable: Code should be clear and self-documenting
Indentation matters: Python uses indentation instead of braces
{}Zero-based indexing: Arrays/lists start at index 0, not 1 (unlike MATLAB)
Dynamic typing: Variables can change type, but be careful in engineering calculations
F-strings: Use
f"Value: {variable}"for modern string formattingFunctions: Always document with docstrings for engineering work (docstrings are multi-line string comments placed right after the function definition to describe its purpose, inputs, and outputs; this helps others understand and maintain your code)
Error Handling and Debugging
Engineers need robust code that handles unexpected situations:
# Error handling with try/except blocks
def safe_divide(a, b):
    """Safely divide two numbers with error handling"""
    try:
        result = a / b
        return result
    except ZeroDivisionError: # Handle division by zero error
        print(f"Error: Cannot divide {a} by zero!")
        return None
    except TypeError: # Handle invalid input types
        print(f"Error: Invalid input types - need numbers, got {type(a)} and {type(b)}")
        return None

# Test error handling
print("Testing error handling:")
print(f"10 / 2 = {safe_divide(10, 2)}")
print(f"10 / 0 = {safe_divide(10, 0)}")
print(f"'10' / 2 = {safe_divide('10', 2)}")

# Common debugging technique: assertions
def calculate_beam_deflection(force, length, E, I):
    """Calculate beam deflection with input validation"""
    assert force > 0, "Force must be positive"
    assert length > 0, "Length must be positive"
    assert E > 0, "Young's modulus must be positive"
    assert I > 0, "Moment of inertia must be positive"

    # Simply supported beam, center load: δ = FL³/(48EI)
    deflection = (force * length**3) / (48 * E * I)  # '**' is the exponentiation operator in Python (length cubed)
    return deflection

# Test with valid inputs
try:
    # Steel beam, you may change the values to negative in the following line to oberserve the output
    delta = calculate_beam_deflection(1000, 2, 200e9, 8.33e-6)
    print(f"Beam deflection: {delta*1000:.2f} mm")
except AssertionError as e:
    print(f"Input validation failed: {e}")
Testing error handling:
10 / 2 = 5.0
Error: Cannot divide 10 by zero!
10 / 0 = None
Error: Invalid input types - need numbers, got <class 'str'> and <class 'int'>
'10' / 2 = None
Beam deflection: 0.10 mm
Task 2 – Data Structures and Basic Operations
NumPy is a fundamental Python library for numerical computing. It provides support for large, multi-dimensional arrays and matrices, along with a collection of mathematical functions to operate on these arrays efficiently. NumPy is widely used in scientific computing, data analysis, and engineering applications. Learn more: https://numpy.org/
Matplotlib is a powerful Python library for creating static, animated, and interactive visualizations. It is widely used for plotting data, generating figures, and customizing charts in scientific and engineering applications. Learn more: https://
Let’s start by importing these three libraries.
# Import necessary libraries
import numpy as np
import matplotlib.pyplot as plt
#import math

# Set up matplotlib for inline plotting,
# "%" is Jupyter magic command:
# a special command that provides convenient shortcuts for common operations.
# it is not a standard part of Python, but only for Jupyter notebooks,
# which is how this lab is written with
%matplotlib inline
Basic Mathematical Operations
You can use Python like a calculator:
# Basic calculations
result1 = -1 - 1
result2 = 2**2
print(f"-1 - 1 = {result1}")
print(f"2^2 = {result2}")
-1 - 1 = -2
2^2 = 4
Creating Arrays (equivalent to MATLAB matrices)
You can save answers by assigning them to variables and create arrays:
# Create 1D arrays (equivalent to MATLAB row vectors)
x1 = np.array([1, 2, 3])  # Creates a 1D array with 3 elements
x2 = np.array([2j, 1+4j, np.pi, -1])  # Complex numbers and pi
x3 = np.array([1+1, 2+2, 3+3])  # Array with calculations

print("x1:", x1)
print("x2:", x2)
print("x3:", x3)
x1: [1 2 3]
x2: [ 0. +2.j 1. +4.j 3.14159265+0.j -1. +0.j]
x3: [2 4 6]
# Create 2D arrays (equivalent to MATLAB matrices)
y1 = np.array([[1, 2, 3], [4, 5, 6]])  # 2x3 matrix
y2 = np.array([[1, 2, 3], [4, 5, 6]])  # Same as y1
y3 = np.array([[1, 2, 3.0], [-4.0, 2-5, 6.00]])  # 2x3 matrix with mixed operations

print("y1:")
print(y1)
print("\ny2:")
print(y2)
print("\ny3:")
print(y3)
y1:
[[1 2 3]
[4 5 6]]
y2:
[[1 2 3]
[4 5 6]]
y3:
[[ 1. 2. 3.]
[-4. -3. 6.]]
Matrix operations
Now let’s do some basic matrix operations. NumPy provides essential matrix operations for engineering calculations.
Key Matrix Operations:
Matrix multiplication:
A @ BElement-wise multiplication:
A * BTranspose:
A.TInverse:
np.linalg.inv(A)Determinant:
np.linalg.det(A)
# Basic Matrix Operations
A = np.array([[1, 2], [3, 4]])
B = np.array([[2, 0], [1, 3]])
vector = np.array([1, 2])

print("Matrix A:")
print(A)
print("\nMatrix B:")
print(B)

# Matrix multiplication (use @ operator)
print("\nA @ B (matrix multiplication):")
print(A @ B)

# Element-wise multiplication (use * operator)
print("\nA * B (element-wise multiplication):")
print(A * B)

# Matrix-vector multiplication
print("\nA @ vector:")
print(A @ vector)

# Transpose
print("\nA transpose (A.T):")
print(A.T)

# Matrix inverse and determinant
print(f"\nDeterminant of A: {np.linalg.det(A):.2f}")
A_inv = np.linalg.inv(A)
print(f"Inverse of A:")
print(A_inv)

# Dot and cross products with 3D vectors
v1 = np.array([1, 2, 3])
v2 = np.array([4, 5, 6])

# Dot product (scalar result)
dot_product = np.dot(v1, v2)
print(f"\nDot product of v1 and v2: {dot_product}")
print(f"  v1 · v2 = (1)(4) + (2)(5) + (3)(6) = {dot_product}")

# Cross product (vector result)
cross_product = np.cross(v1, v2)
print(f"\nCross product of v1 and v2: {cross_product}")
print(f"  v1 × v2 = {cross_product}")
Matrix A:
[[1 2]
[3 4]]
Matrix B:
[[2 0]
[1 3]]
A @ B (matrix multiplication):
[[ 4 6]
[10 12]]
A * B (element-wise multiplication):
[[ 2 0]
[ 3 12]]
A @ vector:
[ 5 11]
A transpose (A.T):
[[1 3]
[2 4]]
Determinant of A: -2.00
Inverse of A:
[[-2. 1. ]
[ 1.5 -0.5]]
Dot product of v1 and v2: 32
v1 · v2 = (1)(4) + (2)(5) + (3)(6) = 32
Cross product of v1 and v2: [-3 6 -3]
v1 × v2 = [-3 6 -3]
Task 3 – Built-in Functions and Plotting
Python with NumPy has many built-in functions similar to MATLAB. The general structure is:
result = function_name(input1, input2, ...)
# Array operations
a = np.array([4, 9, 7])
y = np.sqrt(a)  # Square root
z = np.array([np.max(a), np.min(a), np.mean(a)])  # Max, min, mean

print(f"a = {a}")
print(f"sqrt(a) = {y}")
print(f"[max, min, mean] = {z}")
print(f"Size of a: {a.shape}")
a = [4 9 7]
sqrt(a) = [2. 3. 2.64575131]
[max, min, mean] = [9. 4. 6.66666667]
Size of a: (3,)
Common Mathematical Functions
Here are some commonly used functions:
# Arc tangent
angle = np.arctan(1)  # arctan(1) = π/4
print(f"arctan(1) = {angle} radians = {np.degrees(angle)} degrees")

# Random numbers
random_num = np.random.rand()  # Single random number between 0 and 1
random_array = np.random.rand(3, 3)  # 3x3 array of random numbers
print(f"Random number: {random_num}")

# To print a numpy array with specific precision, use np.array2string
print("Random 3x3 array:")
print(np.array2string(random_array, formatter={'float_kind':lambda x: "%.2f" % x}))
arctan(1) = 0.7853981633974483 radians = 45.0 degrees
Random number: 0.949121739404197
Random 3x3 array:
[[0.19 0.26 0.79]
 [0.62 0.46 0.09]
 [0.72 0.92 0.28]]
2D Plotting
# Create time array and plot sine function
t = np.linspace(0, 10, 100) # Creates exactly 100 points from 0 to 10 (inclusive)
y = 2 * np.sin(t)

# Create a new figure with a specific size (10 inches wide by 6 inches tall)
plt.figure(figsize=(10, 6))
plt.plot(t, y)
# plt.plot(t,y,'b-', linewidth=2)
plt.xlabel('Time (t)')
plt.ylabel('y = 2*sin(t)')
plt.title('Sine Wave Plot')
# Add a text annotation to the plot showing the equation
plt.text(5, 1.5, r'y(t) = 2sin(t)', fontsize=12,
         bbox=dict(boxstyle="round,pad=0.3", facecolor="white", alpha=0.8))
plt.grid(True)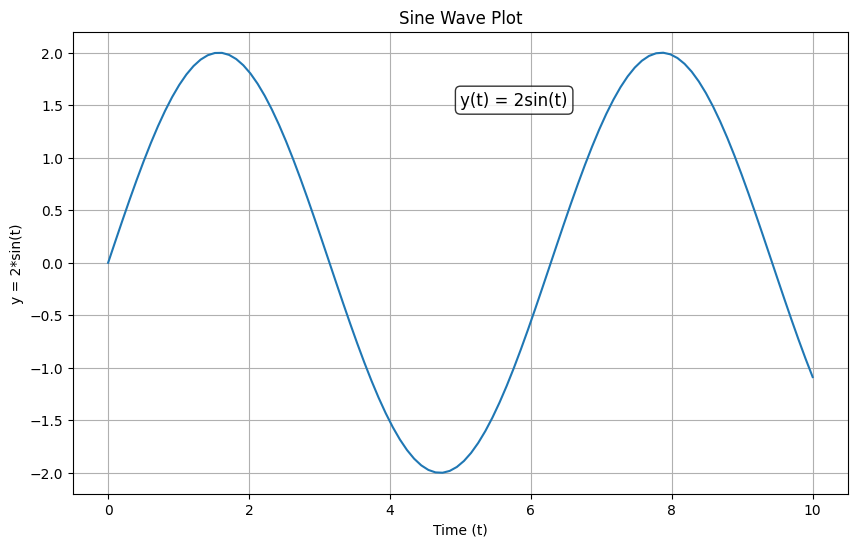
For a DC motor, we can plot the torque-speed curve as a line if given the tau_stall and omega_nl.
# Torque-speed and power-speed curves for a DC motor:
#   tau(omega)   = tau_stall * (1 - omega/omega_nl)
#   power(omega) = tau(omega) * omega

tau_stall = 5.0   # Stall torque (N*m) -- max torque, at zero speed
omega_nl = 50.0   # No-load speed (rad/s) -- max speed, at zero torque

# Speed values from 0 (stall) to omega_nl (no load)
omega = np.linspace(0, omega_nl, 100)
tau = tau_stall * (1 - omega / omega_nl)
power = tau * omega  # Mechanical output power (W)

# Peak power occurs at the midpoint of the torque-speed line (omega = omega_nl/2)
i_peak = np.argmax(power)

fig, axes = plt.subplots(1, 2, figsize=(12, 5)) # Create subplots one row, two columns

# Torque vs. speed
axes[0].plot(omega, tau, 'b-', linewidth=2)
axes[0].set_xlabel('Speed, ω (rad/s)')
axes[0].set_ylabel('Torque, τ (N·m)')
axes[0].set_title('Torque vs. Speed')
axes[0].text(omega_nl * 0.4, tau_stall * 0.7, r'$\tau(\omega) = \tau_{stall}(1-\omega/\omega_{nl})$', fontsize=11,
             bbox=dict(boxstyle="round,pad=0.3", facecolor="white", alpha=0.8))
axes[0].grid(True)

# Power vs. speed:  P(omega) = tau(omega) * omega
axes[1].plot(omega, power, 'r-', linewidth=2)
axes[1].axvline(omega[i_peak], color='gray', linestyle='--', linewidth=1)
axes[1].plot(omega[i_peak], power[i_peak], 'ko')
axes[1].set_xlabel('Speed, ω (rad/s)')
axes[1].set_ylabel('Power, P (W)')
axes[1].set_title(f'Power vs. Speed\nmax P = {power[i_peak]:.1f} W at ω = {omega[i_peak]:.1f} rad/s')
axes[1].grid(True)

plt.tight_layout()
plt.show()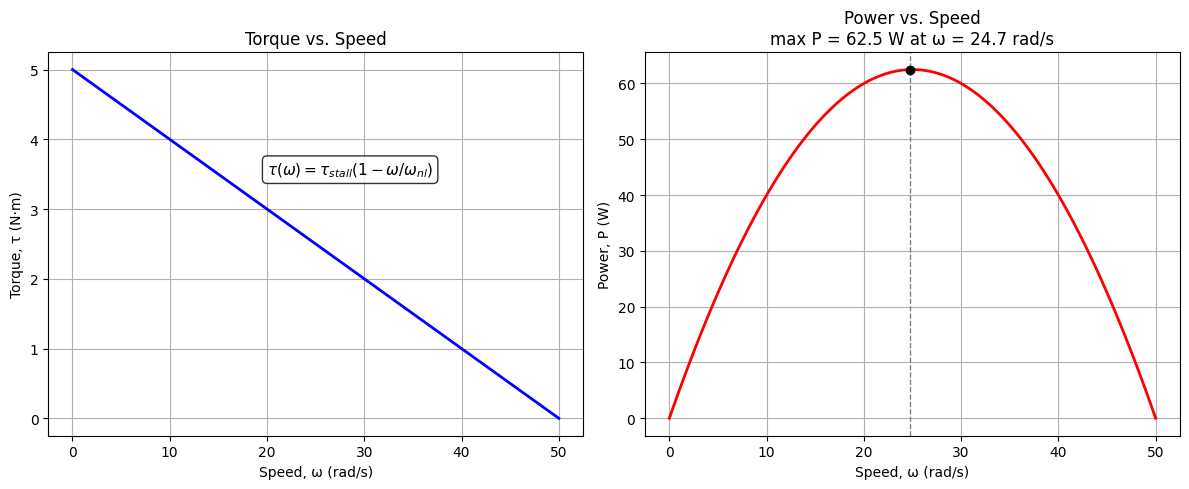
Plot with Custom Functions
In Python, you can define custom functions easily:
def ME416_fun(fxn_input):
    """Custom function that combines sine wave with random noise"""
    return 10 * np.sin(fxn_input * 10) + 5 * np.random.rand(*fxn_input.shape)

t = np.linspace(0, 2, 100)  # Time vector from 0 to 2 seconds
# Use the custom function
y_416 = ME416_fun(t)

plt.figure(figsize=(10, 6))
plt.plot(t, y_416, 'r-', linewidth=1.5)
plt.xlabel('Time (t), sec')
plt.ylabel('Function, f(t), -')
plt.title('Custom Function: 10*sin(10t) + 5*random')
plt.grid(True, alpha=0.3)
plt.show()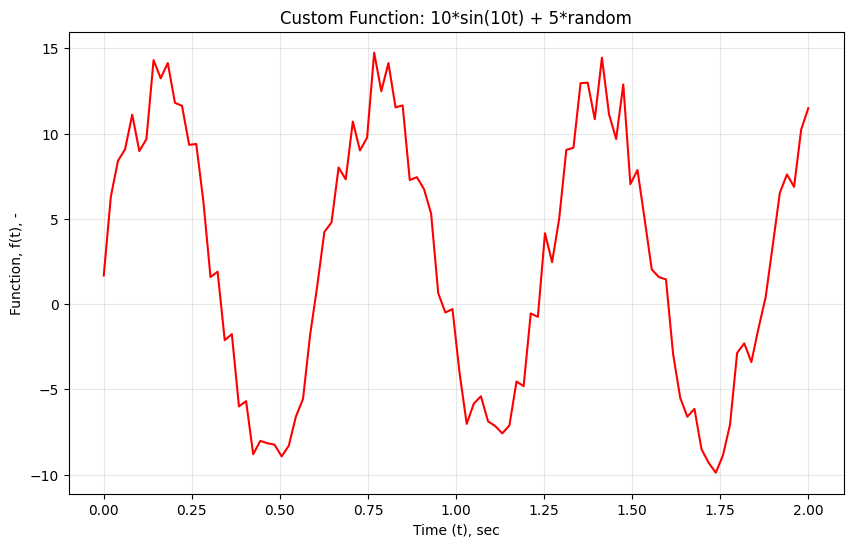
Task 4 – Debugging Techniques in Python
Effective debugging is crucial for engineering applications where accuracy is paramount. Python offers several powerful debugging tools and techniques that every engineer should know. We will mainly use the following:
Print statements and logging
# Strategic Print Statements and Logging
# Example: Beam Support Reaction Analysis (builds on the matrix operations from Task 2)

def calculate_support_reactions(loads, positions, beam_length):
    """
    Calculate the reactions at the two supports of a simply supported beam
    carrying point loads, with debugging prints tracing each step.

    Parameters:
    loads: array of point loads (N)
    positions: array of load positions measured from support A (m)
    beam_length: distance between support A and support B (m)

    Returns:
    numpy.ndarray: [R_A, R_B] reaction forces at the two supports (N)
    """
    print(f"DEBUG: Analyzing beam of length {beam_length} m")
    print(f"DEBUG: Loads = {loads} N at positions = {positions} m")

    # Equilibrium equation 1: sum of forces = 0  ->  R_A + R_B = total_load
    total_load = np.sum(loads)
    print(f"DEBUG: Sum of vertical forces (total load): {total_load} N")

    # Equilibrium equation 2: sum of moments about support A = 0
    # R_B * beam_length = sum(load_i * position_i)
    moment_sum = np.sum(loads * positions)
    print(f"DEBUG: Sum of moments about support A: {moment_sum} N·m")

    # Write the two equilibrium equations as a matrix system: M @ [R_A, R_B] = b
    M = np.array([[1, 1],
                  [0, beam_length]])
    b = np.array([total_load, moment_sum])
    print(f"DEBUG: Coefficient matrix M:\n{M}")
    print(f"DEBUG: Right-hand side vector b: {b}")
    print(f"DEBUG: Determinant of M: {np.linalg.det(M):.4f}")

    # Solve for the reactions using the matrix inverse (same tool used in Task 2)
    M_inv = np.linalg.inv(M)
    reactions = M_inv @ b
    R_A, R_B = reactions
    print(f"DEBUG: Reaction at A: {R_A:.2f} N")
    print(f"DEBUG: Reaction at B: {R_B:.2f} N")

    # Sanity check: reactions should sum back to the total load
    print(f"DEBUG: Check - R_A + R_B = {R_A + R_B:.2f} N (should equal total load {total_load} N)")

    return reactions

# Test with a beam carrying two point loads
print("EXAMPLE: Simply supported beam with two point loads\n")
loads = np.array([500, 800])       # N
positions = np.array([2, 5])       # m from support A
beam_length = 8                    # m

R_A, R_B = calculate_support_reactions(loads, positions, beam_length)

print(f"\nFINAL RESULT:")
print(f"  Reaction at Support A: {R_A:.1f} N")
print(f"  Reaction at Support B: {R_B:.1f} N")
EXAMPLE: Simply supported beam with two point loads
DEBUG: Analyzing beam of length 8 m
DEBUG: Loads = [500 800] N at positions = [2 5] m
DEBUG: Sum of vertical forces (total load): 1300 N
DEBUG: Sum of moments about support A: 5000 N·m
DEBUG: Coefficient matrix M:
[[1 1]
[0 8]]
DEBUG: Right-hand side vector b: [1300 5000]
DEBUG: Determinant of M: 8.0000
DEBUG: Reaction at A: 675.00 N
DEBUG: Reaction at B: 625.00 N
DEBUG: Check - R_A + R_B = 1300.00 N (should equal total load 1300 N)
FINAL RESULT:
Reaction at Support A: 675.0 N
Reaction at Support B: 625.0 N
HW Problems
Now that you’ve learned the basics, practice the following problems. Work through them step by step, using the debugging techniques you’ve learned. You need to submit your solutions to these HW problems with your source code.
Problem 1: Basic Python Syntax and Control Flow
In this problem, you will analyze material properties for design selection.
Task: Write a program that:
Creates a dictionary of materials with their properties (density, yield strength, cost per kg)
Finds the material with the highest strength-to-weight ratio
Determines which materials are suitable for a given application (yield strength > 200 MPa, cost < $10/kg)
Uses proper error handling for invalid inputs
Given data:
Steel: density=7850 kg/m³, yield=250 MPa, cost=$2/kg
Aluminum: density=2700 kg/m³, yield=70 MPa, cost=$8/kg
Titanium: density=4500 kg/m³, yield=880 MPa, cost=$30/kg
Carbon Fiber: density=1600 kg/m³, yield=600 MPa, cost=$50/kg
# Problem 1 Solution Space
# Write your solution here

# Hint: Start by creating the materials dictionary
materials = {
    # Fill in the material properties
}

# Your code here...
Problem 2: NumPy Arrays and Mathematical Operations
In this problem, you will analyze experimental strain gauge data and plot them.
Task: Given strain measurements from 5 gauges over 10 time steps:
Create a 2D NumPy array (10 time steps × 5 gauges) with realistic strain data
Calculate the maximum, minimum, and average strain for each gauge
Find the time step where the maximum overall strain occurred
Calculate the stress using σ = E × ε (E = 200 GPa for steel)
Plot strain vs time for all gauges on the same plot with different colors
Add proper labels, legend, and title
Hints:
Use
np.random.normal()to generate realistic strain data around 0.001 (1000 microstrain)Use
np.argmax()to find indices of maximum valuesRemember to convert units properly (strain is dimensionless, stress in Pa)
# Problem 2 Solution Space
import numpy as np
import matplotlib.pyplot as plt

# Create time array
time = np.linspace(0, 10, 10)  # 10 time steps from 0 to 10 seconds

# Generate strain data (your code here)
# Hint: strain_data = np.random.normal(loc=0.001, scale=0.0002, size=(10, 5))

# Your analysis code here...